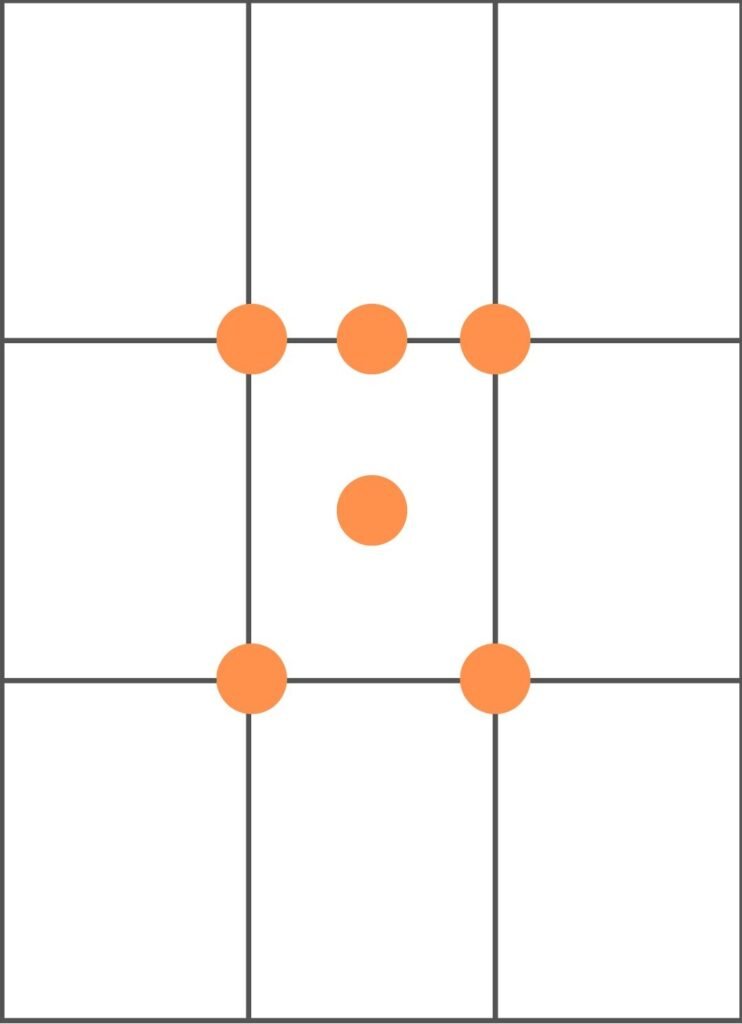
I have seen so many, in fact, too many photos on social media that missed the opportunity to be a good photo just because the lines were not correctly used. You have probably heard or read the names grid, golden, or leading lines in so many places. Even after so many explainer articles and videos, I wonder why many people do not understand this basic concept properly. Yes, the obvious reason may be that a lot of people are just not interested in taking good photos. But I think there are people who just need an easier way to understand the concept of lines. So in this article, I will try to give you an easier way to understand and use lines in your photos.
Gridline:
The most basic line of them all. Nowadays every camera and mobile phone has this gridline included with the camera settings. It might be shocking for some that this was not the case even a few years back. By using only this gridline in your device you can easily make a photo look good. As I have shown in the pictures below, gridlines are lines that divide your camera screen into 9 parts. If you know what your subject is, a person, a flower, or a dog, then you need to decide where to place your subject first. Notice the orange circles I have placed in the intersections are two other places along the midline. These spots are the sweet spots to frame your subject. More specifically, place the head or top of your subject in those spots. That will immediately make your photos look better.

(landscape orientation)

(portrait orientation)
There is another important use of the gridlines. That is to place your horizon along the gridlines. Follow the orange line that I have highlighted below. You need to place your horizon along these two lines.

Important Line for Travel Photography
There is an important rule of line you need to be careful about while doing travel photography. In this scenario, you obviously need to accommodate as much landscape as possible. But more often than not, you will also have a person as a subject. What you need to remember here is to never allow the horizontal line to traverse the head of your subject. This is kind of a non-negotiable rule for travel photography. I have never seen a good photo that broke this rule, not even for artistic freedom.

(look at my head disrupting the horizon)
Leading Line
Another well-talked-about line is the leading line. The idea is to place your subject along with a naturally forming line in your surroundings. This gives the viewer’s eyes a sense of adventure while looking at a photograph. The best uses of the leading line also follow some simple rules. First, it is best that your line starts from the bottom part of your frame. This way, the first thing a viewer will notice is the line. Then after following upwards with the line, they will find your subject. Secondly, no matter where the line starts, place your subject in the spots I have shown here at the beginning.

These few rules are enough to get you started using lines in your photos more. Trust me, you will see the difference immediately. For obvious reasons, I have left out or oversimplified a lot of things. Because this article is meant for absolute beginners. After putting up enough time with photography you will start to understand more on your own. Then little by little, when your eyes start to see more artistic value in breaking rules, do it. But always start with the basics.


